Quick answer: In desktop Microsoft Word for Windows, open the Font dialog (press Ctrl+D), choose your preferred font and size, click Set As Default, and select All documents based on the Normal template. New blank documents based on that template will use your chosen settings. Microsoft 365’s modern default font is Aptos; older Word versions commonly used Calibri or Times New Roman.
Steps to set default font in Word:
1): Right-click anywhere in the document and click “Font” to open Font dialogue box
2): In Font Tab, set the desired “Font”, “Font style”, “Size”, Font colour and other settings (as per requirement)
3): Click “Set as Default”
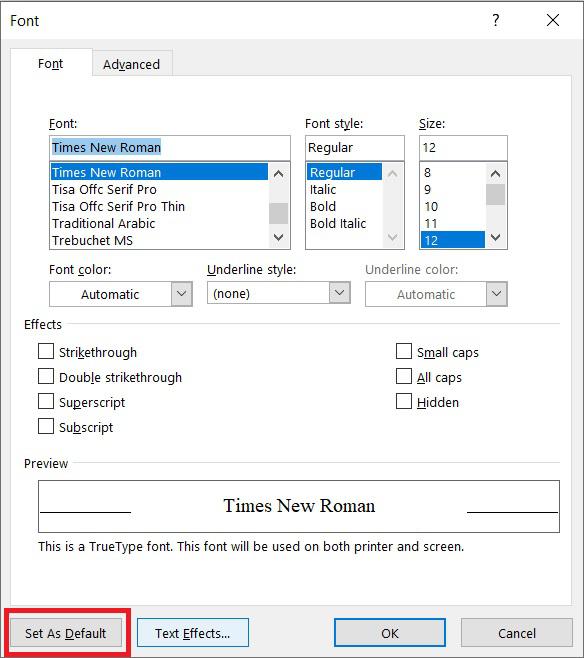
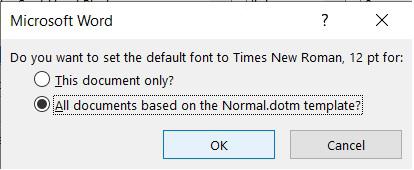
4): Select “All documents based on the Normal.dotm template?”, to set above font style as default font for all Ms Word documents.
The entire procedure is also shown in our YouTube video
Additional Tips and Troubleshooting
Current Document vs. All New Documents
When Word asks where to apply the change, This document only changes the current file’s default formatting, while All documents based on the Normal template affects future documents using that template. Existing files and documents based on other templates do not automatically change.
Troubleshooting Default Font Changes
- New documents still use the old font: Confirm that you selected the Normal-template option, and that the new file is based on that template.
- Font changes after applying a style: A paragraph style may override the default. Modify the relevant style separately if needed.
- Using Word for Mac or the web: Menus and template behavior differ; the Windows steps above may not apply exactly.
- Changes are not retained: Check whether Word can save its Normal template and whether organizational policies control the template.

C P Gupta is a YouTuber and Blogger. He is expert in Microsoft Word, Excel and PowerPoint. His YouTube channel @pickupbrain is very popular and has crossed 9.9 Million Views.