Got an extra page in your Word document that just won’t go away? It could be a blank page in the middle, an empty page after a table, or a last page that comes back every time you press Delete. You’re not alone. Deleting a page in Word on Mac works a little differently from Windows: the shortcuts use ⌘ and ⌥, the Delete key acts as Backspace, and some settings live in the macOS Format menu instead of the ribbon.
In this guide, you’ll learn every way to delete a page in Microsoft Word for Mac, with annotated screenshots taken in Word for Mac (Microsoft 365, version 16.114). Each method fixes a different cause, so start with the quick answer and then go to the section that matches your problem.
Quick answer: How to delete a page in Word on Mac
- Press ⌘ + 8 to show paragraph marks and page breaks.
- Go to the page you want to remove. Click at the start of its content, then Shift-click at the end to select everything on it.
- Press Delete. On a blank page, select the Page Break or Section Break line and press Delete.
- If the blank last page is caused by a table, select the final ¶ mark and set its font size to 1.
Why does Word for Mac add extra pages?
Word never adds a page for no reason. A blank or extra page is always caused by something you can’t normally see. Find the cause and the fix takes one click:
| What you see | Most likely cause | Fix |
|---|---|---|
| A page full of text you don’t need | Unwanted content | Method 1 or Method 2 |
| A blank page in the middle of the document | Manual page break or empty paragraphs | Method 3 |
| A blank page before a new chapter or section | Section Break (Next Page / Odd Page) | Method 4 |
| A blank page at the very end, after a table | The mandatory paragraph mark after the table | Method 5 |
| A heading or paragraph that always jumps to a new page | “Page break before” / “Keep with next” | Method 6 |
Step 0: Find the extra page with the Thumbnail pane and Show/Hide 
Before deleting anything, use these two built-in tools to see exactly where the extra page is and what’s on it.
Open the Thumbnail pane
In the macOS menu bar, click View ▸ Sidebar ▸ Thumbnail. A sidebar opens with a small preview of every page, so a blank page stands out right away. Click a thumbnail to jump to that page.
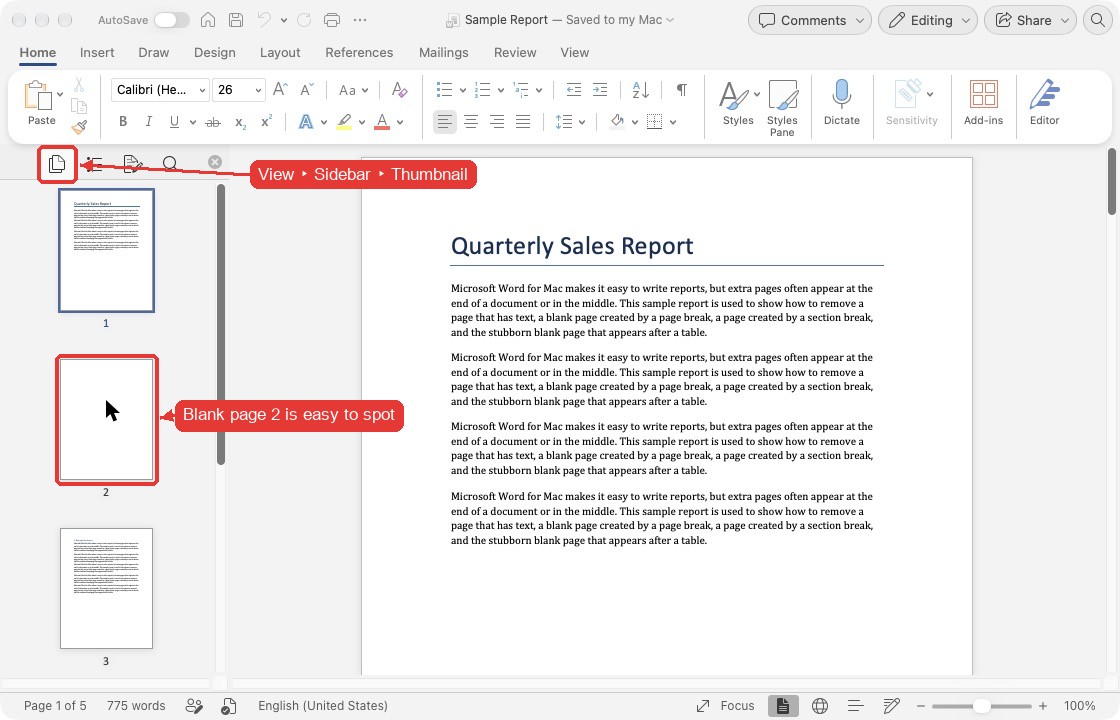
Note: In Word for Mac you can’t delete a page by selecting its thumbnail and pressing Delete. The Thumbnail pane only helps you find the page. Use the methods below to remove it.
Turn on formatting marks (⌘ + 8)
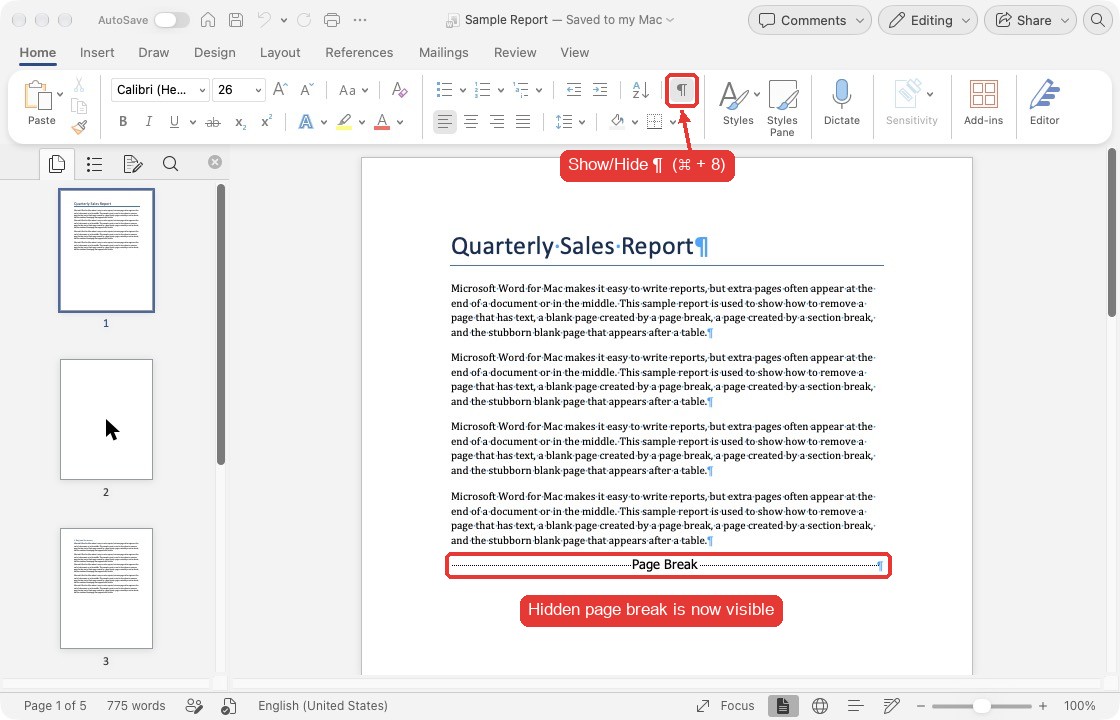
Press ⌘ + 8, or click the ¶ (Show/Hide) button on the Home tab. Word now shows paragraph marks (¶), page breaks, and section breaks, which are the hidden items that create extra pages. This is the most useful step in this guide.
Method 1: Delete a page with text or images (select and delete)
Use this when the page has content you want to remove: text, images, or a table.
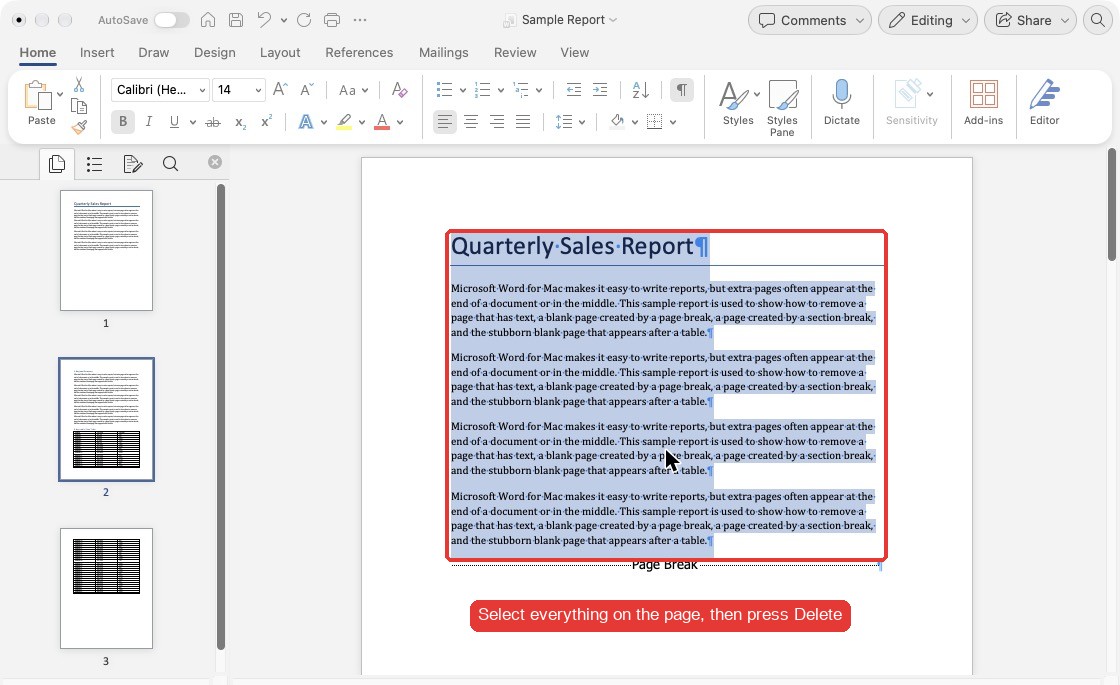
- Click just before the first word on the page.
- Scroll to the end of the page, hold Shift, and click just after the last word. Everything in between is selected.
- Press Delete. If any empty lines remain, press Delete again until the next page’s content moves up.
Mac tip: The Delete key on a Mac keyboard deletes backwards, like Backspace on Windows. To delete forward (the character to the right of the cursor), press Fn + Delete. This is handy when the cursor is at the start of an empty page.
Method 2: Select a whole page instantly with Go To (⌥ + ⌘ + G)
Selecting a long page with the mouse can be tricky. Word has a hidden bookmark called \page that selects the entire current page in one step.
- Click anywhere on the page you want to delete.
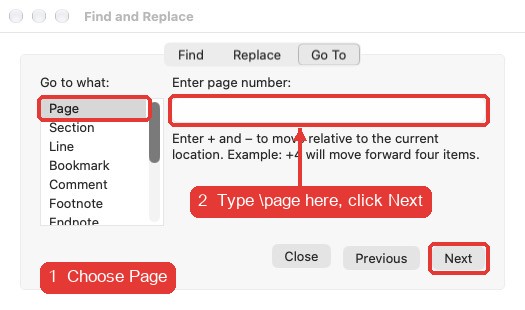
- Press ⌥ Option + ⌘ + G, or go to Edit ▸ Find ▸ Go To… The Find and Replace dialog opens on the Go To tab.
- Under Go to what, make sure Page is selected.
- In Enter page number, type
\pageand click Next. Word selects the whole page. - Click Close, then press Delete.
Need to remove several pages at once? See our guide on the shortcut to delete multiple pages (a range of pages) in Word.
Method 3: Delete a blank page caused by a page break or empty paragraphs
This is the most common cause of a blank page in the middle of a document. With formatting marks on (⌘ + 8), the blank page shows either a dotted Page Break line or a column of ¶ marks.
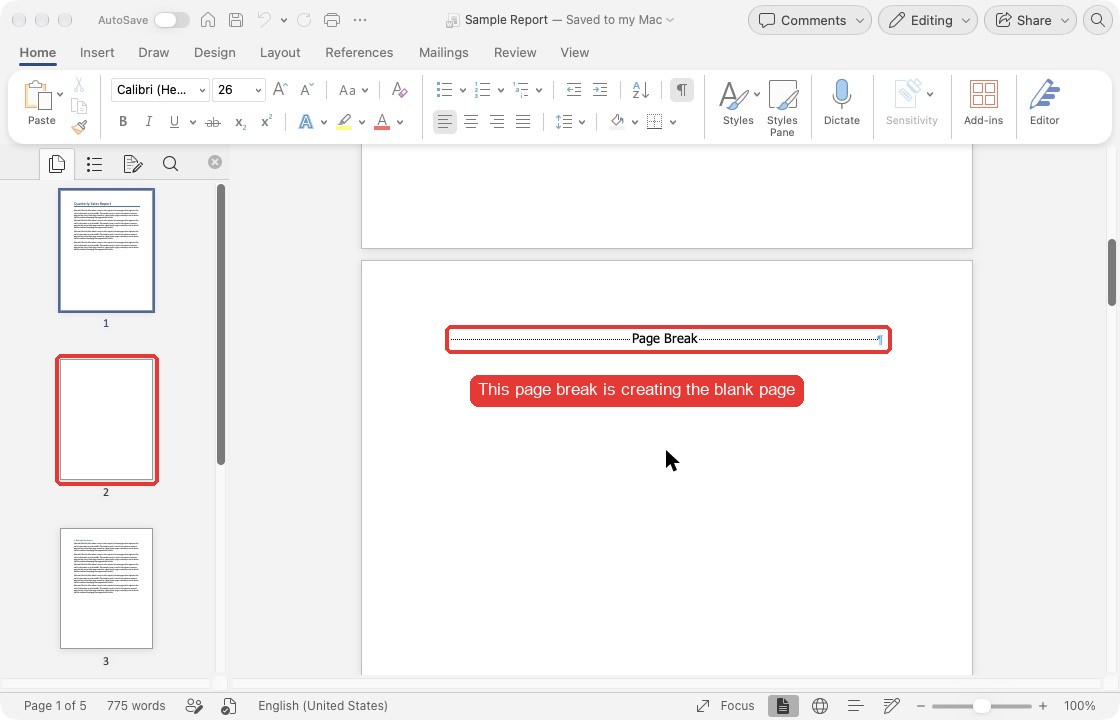
- Double-click the Page Break line to select it. You can also click just before it and press Fn + Delete.
- Press Delete.
- If the page is full of ¶ marks (empty paragraphs), drag across them to select them and press Delete.
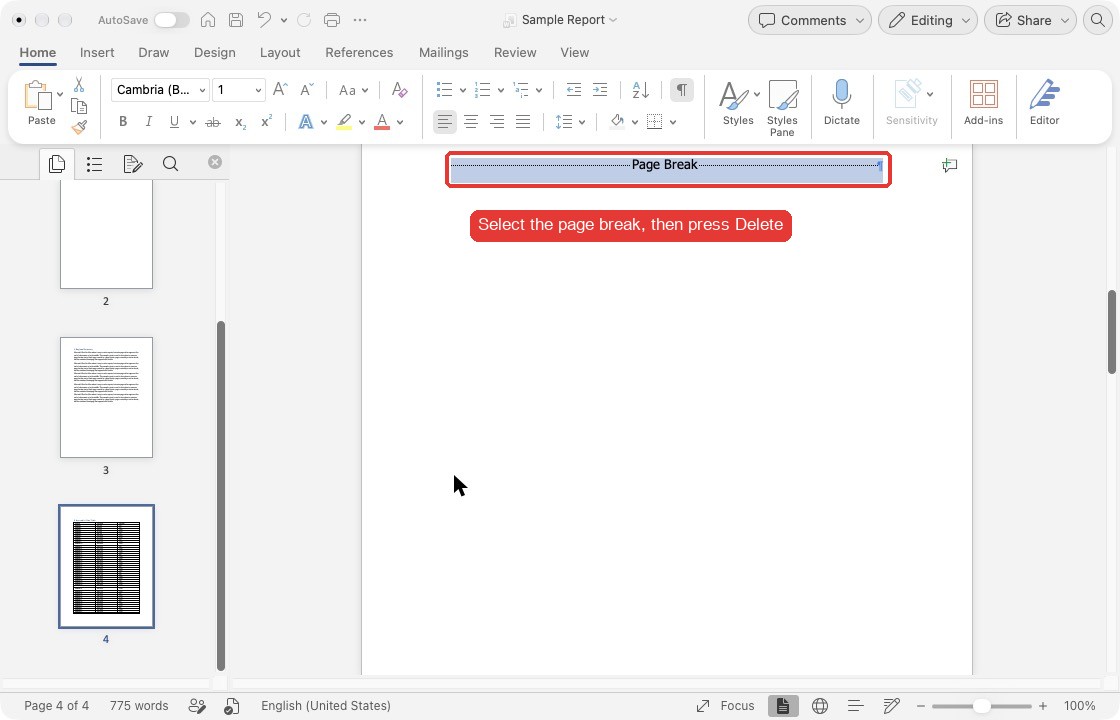
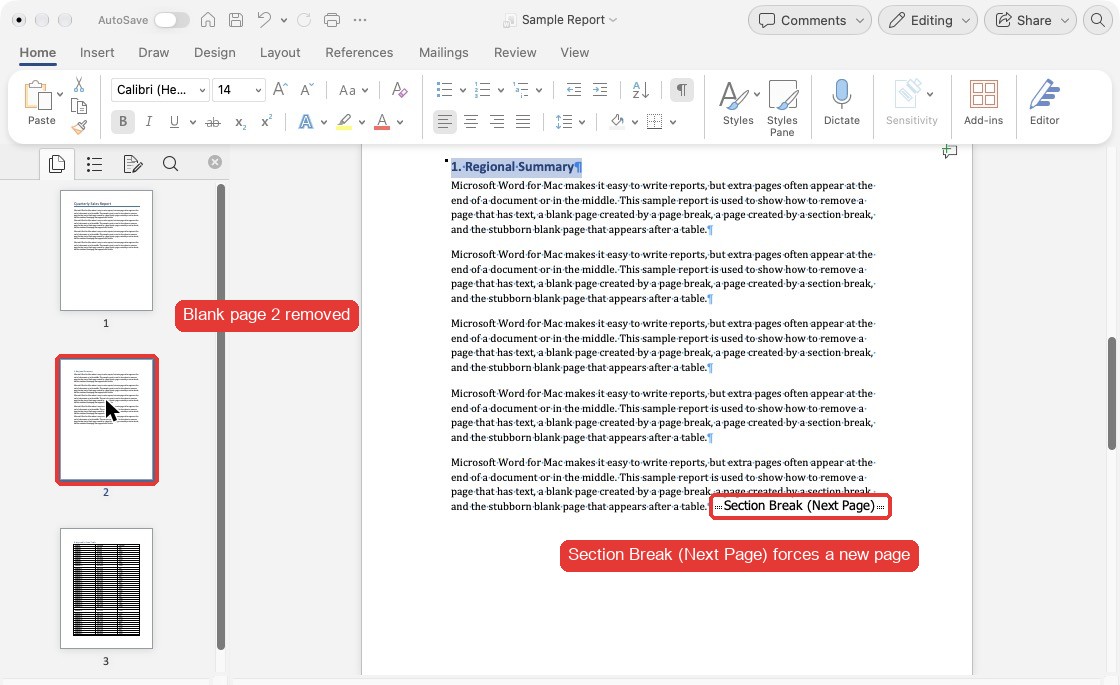
The blank page disappears and the following content moves up. In our sample, the Thumbnail pane went from showing a blank page 2 to showing text on page 2:
Tip: To add a page break on Mac, press ⌘ + Return. If you’ve been pressing Return many times to push text to a new page, use a page break instead. It’s cleaner and won’t leave blank pages behind. For more, read how to remove page breaks in Word.
Method 4: Remove a blank page caused by a section break
A Section Break (Next Page), (Odd Page), or (Even Page) always starts the next section on a new page. That’s how you end up with a half-empty or completely blank page.
Be careful: Deleting a section break merges two sections, and the section after the break loses its own formatting (headers, footers, page numbering, orientation). If you use different headers or page numbering that starts on page 2, change the break type instead of deleting it.
Option A: Change the section break to Continuous (recommended)
- Click anywhere in the section after the break, that is, the content that starts on the new page.
- From the menu bar, choose Format ▸ Document… and open the Layout tab.
- The Section start box shows New page (or Odd/Even page). That’s what is forcing the new page.
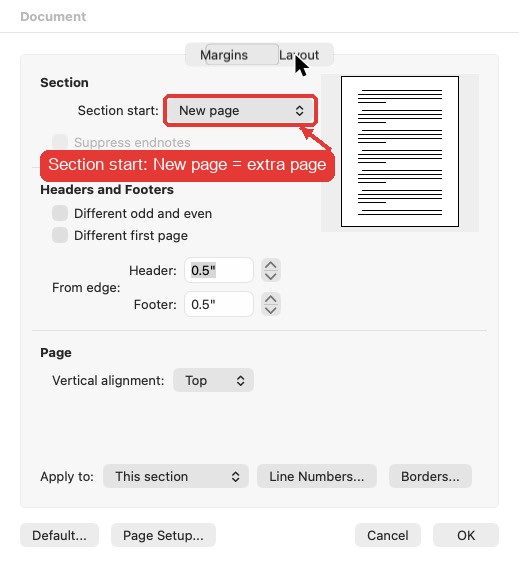
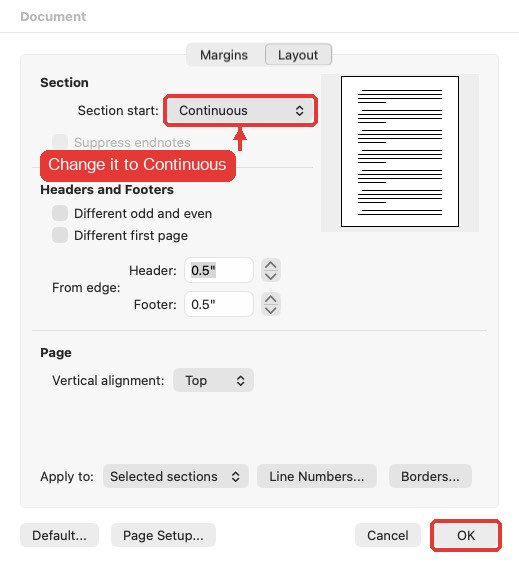
- Change Section start to Continuous, make sure Apply to is set to This section (or Selected sections), and click OK.
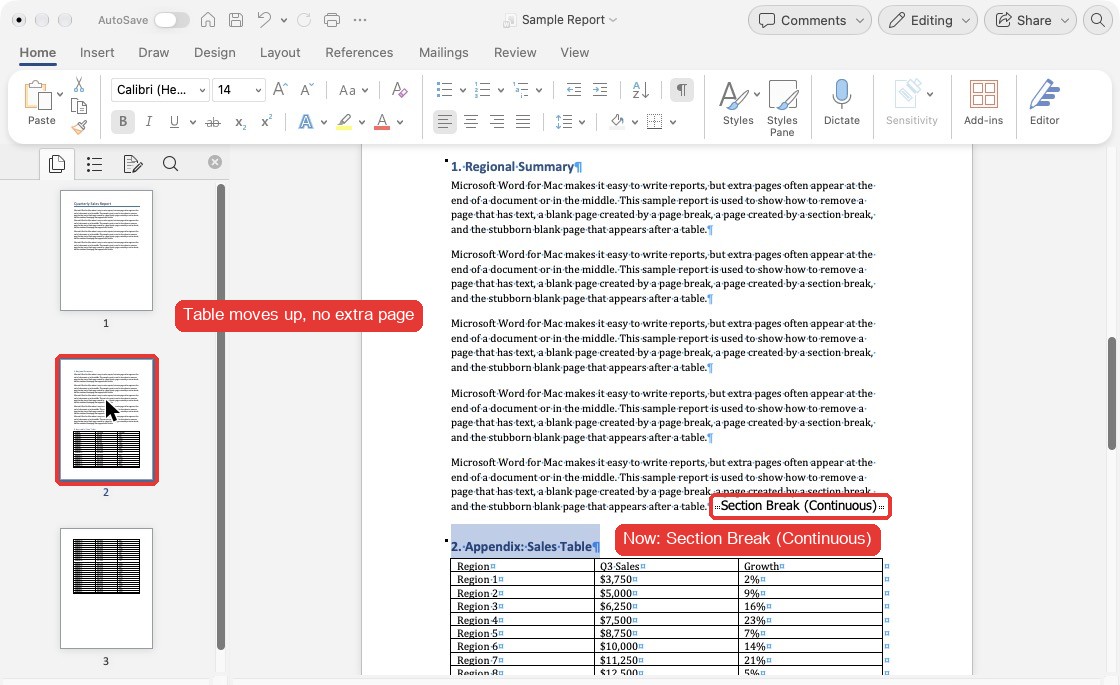
The break now reads Section Break (Continuous). The next section starts right below the previous one, and the extra page is gone. Headers, footers, and page numbering stay as they were.
Option B: Delete the section break
If both sections use the same formatting, you can delete the break. With ⌘ + 8 on, double-click the Section Break line and press Delete. If it’s hard to click, switch to View ▸ Draft. Draft view shows every break as a full-width line that is easy to select.
Odd Page / Even Page section breaks: Word inserts a blank page so a chapter starts on a right-hand (odd) page. In Print Layout you may not see that page, but it appears in the printed copy and in PDFs. Change the break to Next page or Continuous to remove it.
Method 5: Delete the blank last page after a table (the one that won’t go away)
This is the most frustrating one. Your document ends with a table that fills the last page, and Word adds an empty page after it. Pressing Delete does nothing.
Why it happens: Word always needs a paragraph mark (¶) after a table, and you can’t delete it. If the table reaches the bottom of the page, that last ¶ has nowhere to go, so Word pushes it onto a new, blank page.
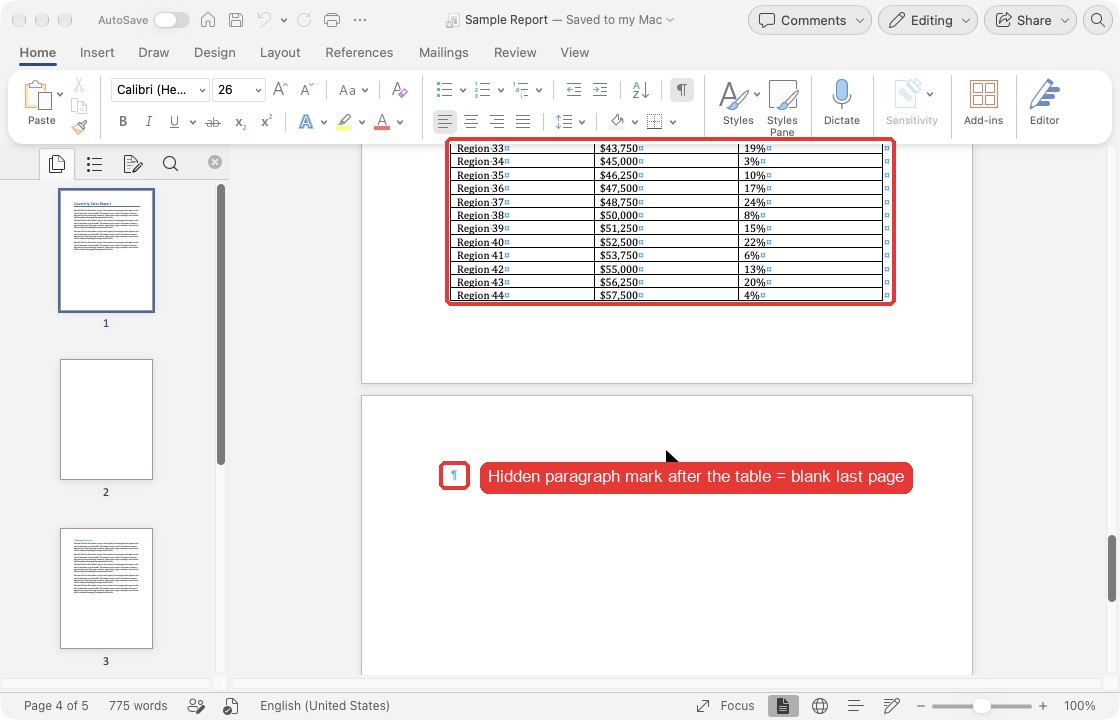
Fix: Make the last paragraph mark tiny (font size 1)
- Press ⌘ + 8 so the ¶ is visible on the blank page.
- Triple-click the ¶ to select it.
- On the Home tab, click the Font Size box, type
1, and press Return.
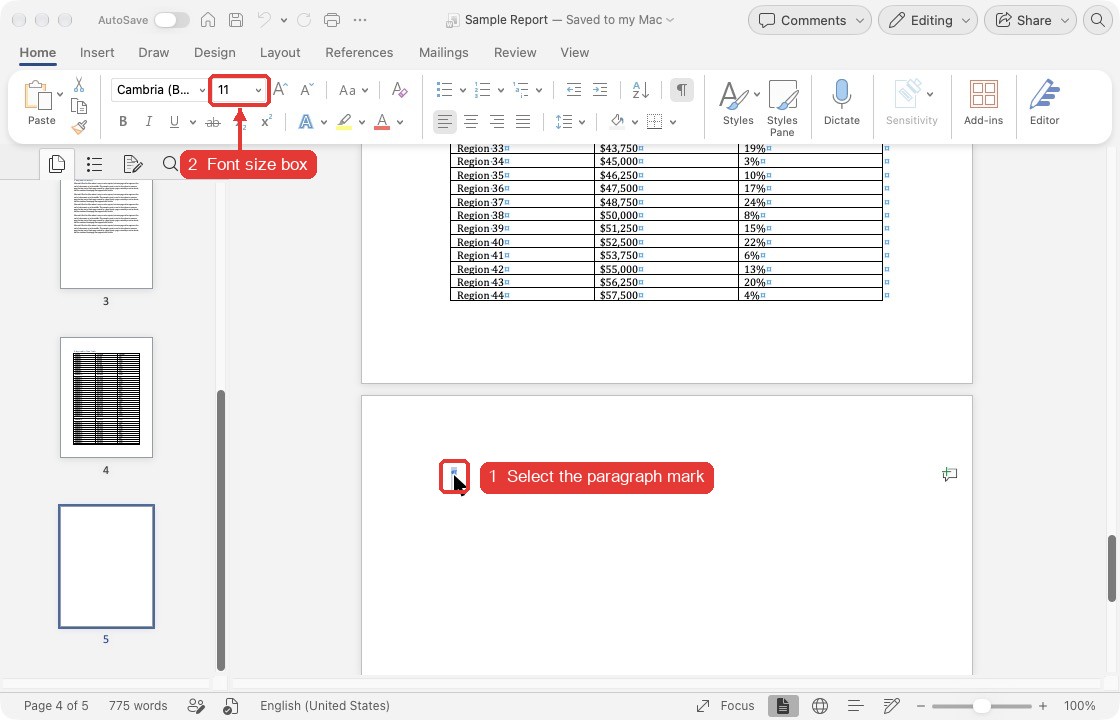
The paragraph mark becomes so small that it fits under the table on the previous page, and the blank last page disappears. In our test document, the blank last page disappeared instantly and the page count went down by one.
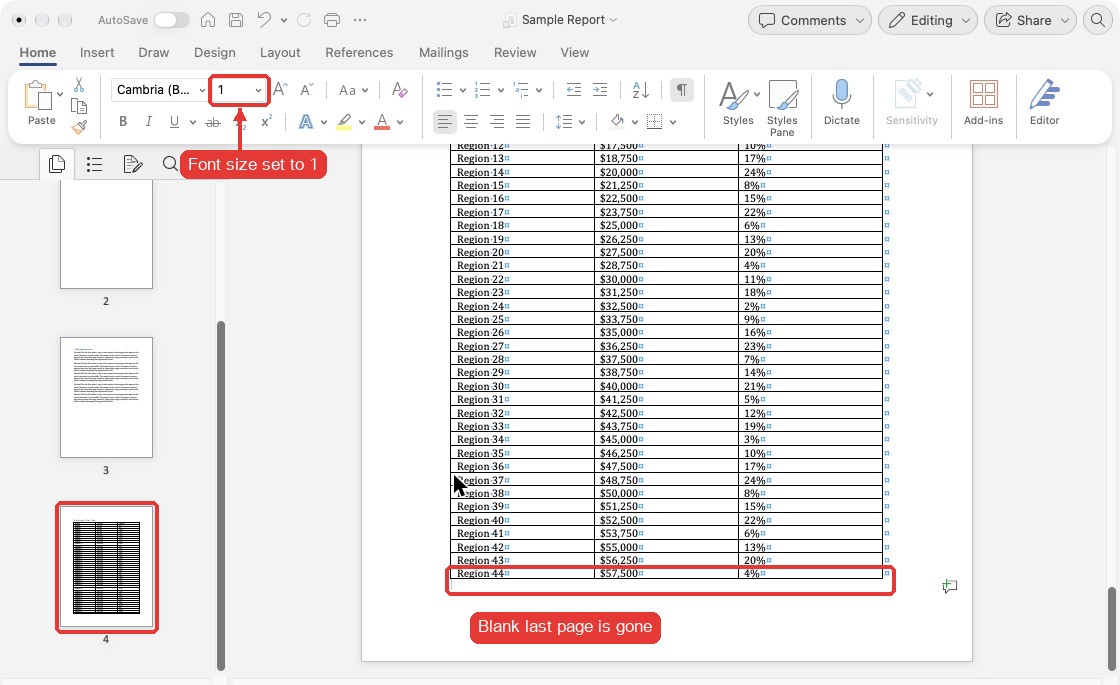
Press ⌘ + 8 again to hide formatting marks when you’re done.
Still there? Try these alternatives
- Set line spacing to Exactly 1 pt: With the ¶ selected, go to Format ▸ Paragraph… ▸ Indents and Spacing. Set Spacing Before and After to
0 pt, and Line spacing to Exactly1 pt. - Hide the paragraph mark: Select the ¶, press ⌘ + D (Format ▸ Font), tick Hidden, and click OK. The page disappears once formatting marks are turned off.
- Shrink the bottom margin slightly: Go to Format ▸ Document ▸ Margins and reduce Bottom by 0.1″ so the ¶ fits on the previous page.
- Remove one empty table row if the table has a blank row at the end.
Related: why a Word table keeps starting on the next page and how to keep an entire table on one page.
Method 6: Fix paragraph settings that push text to a new page
Sometimes there’s no page break or section break, yet a heading always starts on a new page and leaves a big gap. The cause is a paragraph setting.
- Click in the heading or paragraph that jumps to the next page.
- Go to Format ▸ Paragraph… and open the Line and Page Breaks tab.
- Untick Page break before. If a whole block keeps moving together, also untick Keep with next and Keep lines together.
- Click OK.
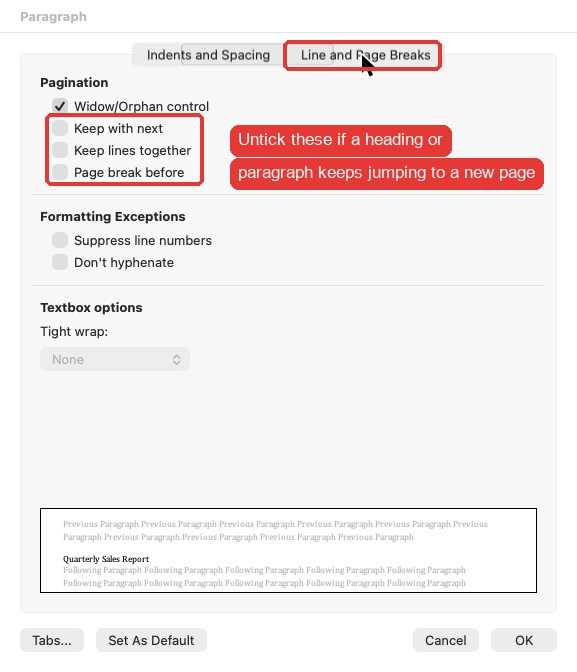
If the setting comes from a heading style (for example, every Heading 1 starts on a new page), change it once in the style instead: Format ▸ Style… ▸ select the style ▸ Modify ▸ Format ▸ Paragraph. See also: how to stop text from jumping to the next page in Word.
Word for Mac vs Windows: shortcuts for deleting pages
| Action | Word for Mac | Word for Windows |
|---|---|---|
| Show/Hide formatting marks (¶) | ⌘ + 8 | Ctrl + Shift + 8 |
| Go To (select a page with \page) | ⌥ + ⌘ + G | Ctrl + G or F5 |
| Delete character to the left | Delete | Backspace |
| Delete character to the right | Fn + Delete | Delete |
| Insert a page break | ⌘ + Return | Ctrl + Enter |
| Open Font dialog | ⌘ + D | Ctrl + D |
| Section break settings | Format ▸ Document ▸ Layout | Layout ▸ Page Setup dialog ▸ Layout |
| Page thumbnails | View ▸ Sidebar ▸ Thumbnail | View ▸ Navigation Pane ▸ Pages |
| Undo a deletion | ⌘ + Z | Ctrl + Z |
Frequently asked questions
Why can’t I delete the blank page at the end of my Word document on Mac?
Usually because the document ends with a table, and Word requires a paragraph mark after every table. That ¶ can’t be deleted, so make it tiny instead: select it and set the font size to 1 (Method 5). If there’s no table, press ⌘ + 8 and look for a page break, a section break, or extra ¶ marks at the end.
How do I delete a blank page in the middle of a Word document on a MacBook?
Press ⌘ + 8 to show hidden marks, go to the blank page, select the Page Break line or the empty ¶ marks, and press Delete. If it’s a Section Break (Next Page), change it to Continuous under Format ▸ Document ▸ Layout.
Can I delete a page from the Thumbnail pane in Word for Mac?
No. Clicking a thumbnail only takes you to that page. After you jump there, use ⌥ + ⌘ + G and \page to select the page, then press Delete.
Deleting a section break changed my headers and page numbers. How do I undo it?
Press ⌘ + Z right away. Then use Option A in Method 4: change the break to Continuous instead of deleting it. Your headers, footers, and numbering stay the same.
The blank page only appears in the PDF or printout. Why?
That’s usually an Odd Page or Even Page section break. Word adds the blank page only when it prints or exports. Change the break to Next page or Continuous. If you export PDFs with bookmarks, see how to save Word as PDF with bookmarks and hyperlinks.
Do these steps work in Word 2019, 2021, 2024, and Microsoft 365 for Mac?
Yes. The menus (View ▸ Sidebar, Edit ▸ Find ▸ Go To, Format ▸ Document, Format ▸ Paragraph) and the shortcuts are the same in Word 2019, 2021, 2024, and Microsoft 365 for Mac. The screenshots here are from Microsoft 365 for Mac (version 16.114).
Final thoughts
An extra page in Word for Mac always has a hidden cause. Press ⌘ + 8 first. Once you can see the page break, section break, or paragraph mark responsible, the fix is one of the six methods above. Bookmark this page for the next time a blank page shows up, and tell us in the comments which method worked for you.
Related Posts
None found
