
10 Microsoft Word productivity tips: what works and where
Save time in Microsoft Word with ten practical techniques for editing, navigation, reusable content, formatting and document review. The instructions below distinguish desktop features from commands that may vary by Microsoft 365 version or platform.
1. Look up a term with available research tools
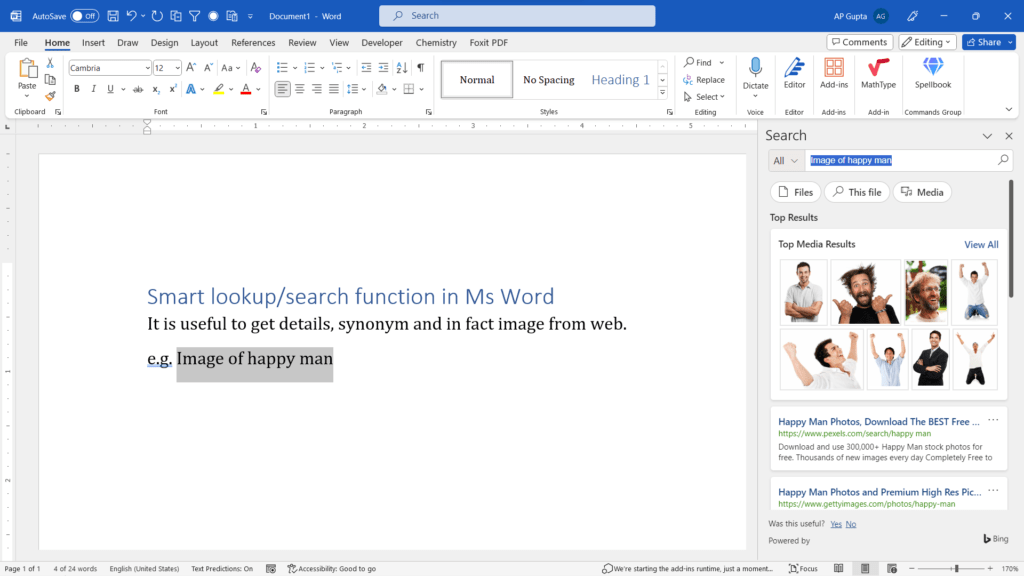
Availability: Smart Lookup was offered in some older desktop Office releases; it is not a dependable feature in current Word editions. Check your version before following an older screenshot. For definitions, use Word’s available dictionary or thesaurus commands, or consult a trusted reference source separately.
In older versions with Smart Lookup, select a term and look for the command in the context menu or ribbon. If it is missing, do not spend time changing security settings to restore it. The screenshot below illustrates the historical interface rather than a guaranteed current menu.
2. Co-authoring: Collaborate in Real Time
Availability: Supported Microsoft 365 Word apps and Word for the web; collaboration requires appropriate sharing permissions and a document stored in OneDrive or SharePoint.
Gone are the days of sending multiple versions of a document back and forth via email. With Word’s co-authoring feature, you can work on a document simultaneously with your colleagues or clients. Simply save the document to OneDrive or SharePoint, invite others to collaborate, and watch as changes are made in real time. This seamless collaboration will save you time and ensure everyone is on the same page.
3. Math AutoCorrect Feature: Type symbols and equations with ease
Availability: Math AutoCorrect is supported in desktop Word equation editing; exact commands and settings differ by platform and version.
For a Greek letter in an equation, choose Insert > Equation (or press Alt + = in desktop Word for Windows), type \alpha, and press Space in a supported UnicodeMath/Math AutoCorrect context. Typing that command in ordinary body text does not necessarily convert it unless the optional outside-math setting is enabled. See the Greek-letter guide and equation shortcuts.
4. Focus Mode: Distraction-Free Writing
Available: Word 2019 and later
In a world full of distractions, maintaining focus while writing can be a challenge. Luckily, Word’s Focus Mode can help. By entering Focus Mode, all unnecessary elements, such as toolbars and menus, fade away, leaving you with a clutter-free interface that lets you concentrate on your words.
To activate Focus Mode, go to the ‘View’ tab and click on ‘Focus’ in the ‘Immersive’ group.

5. Dictate with Ease: Slow typing not a problem
Available: Word 2016 and later
Say goodbye to typing fatigue! Utilize Word’s built-in dictation feature for effortless content creation.
Go to ‘Home’ > ‘Dictate’ and start speaking. Word will convert your speech into text, allowing you to draft documents hands-free.
Do not confuse Dictate with Read Aloud: Dictate turns speech into text using a microphone; Read Aloud speaks existing document text. Their availability, language support and privacy requirements differ. Review the transcribed text for names, numbers and punctuation before sharing.
6. Quick Parts for Reusable Content: Do it once and use it for ever
Available: Ms Word 2007 and later
If you frequently use the same snippets of text or elements, such as headers, footers, or logos, the ‘Quick Parts’ feature (Insert > Quick Parts) is your time-saving ally. Save these elements as Quick Parts and insert them with a click whenever needed. For more details on how to create reusable text snippets in Ms Word visit here.
7. Repeat last action: Automate it
The “Repeat the Last Task” feature in MS Word allows you to quickly and easily replicate the most recent action you performed. Whether it’s formatting text, inserting a table, deleting or adding rows or applying a specific style, this function eliminates the need to navigate through menus or remember keyboard shortcuts.
In desktop Word for Windows, try F4 to repeat the last repeatable action; some laptops require Fn + F4. Not every action can be repeated, and behavior varies by Word edition. Check the result before repeating an operation across a document.
Applicable: Office 2007 onwards
8. Shrink to one page: Automatically adjust size of text to fit in 1 page
Available: Ms Word 2010 and above
While writing some text or letter you may need to ensure that text fits in one page. If you need to do this regularly then this built in feature of Ms Word will save your lot of time. To use this command you need to add it into quick access tool bar using the following steps
- In Customize Quick Access Toolbar (the small down arrow) and choose More Commands. This opens Ms Word options
- Under Choose commands from, select All commands
- Select Shrink one page from the list of commands.
- Click Add to add this in Quick access tool bar
- Click ok
Once shrink one page button is added in Quick Access toolbar do the following
Save a copy, then click Shrink One Page to try reducing the document’s overall length by approximately one page. This is not a command to resize only selected text, and it does not guarantee a particular document will fit on one page. Inspect font size, line spacing, page breaks and readability afterward; undo if the result is too small.
9. Jump to last edited position: Shift + F5
Available: Ms Word 2007 and later
While editing long document you may quickly need to jump your edited places. The Shift-F5 keyboard shortcut is a powerful tool that allows you to quickly jump to the place in your document that you most recently edited. Press Shift-F5 once to jump to the place in your document that you most recently edited.
10. Optimum sized table: Autofit column width
Available: Ms Word 2007 and later
After filling contents of table, in just few clicks you can quickly optimize (reduce) the size of the table.
Select the table, then choose Table Layout > AutoFit > AutoFit Contents in desktop Word. This adjusts column widths based on content; it does not guarantee that every row or the entire table fits on one page. Use AutoFit Window when fitting the table to the available page width is the goal. See the AutoFit table guide.
Conclusion
These ten tips cover different tasks, from collaborating and inserting equations to navigating long documents. Start with the feature that solves your immediate problem, confirm it exists in your Word edition, and check the resulting formatting or text before applying the same action repeatedly.
Related Posts
Check feature availability before following a tip
Word for Windows, Word for Mac and Word for the web do not always expose the same commands. If Smart Lookup, Focus, Dictate or another feature is absent, search the Word ribbon for its name and check your version and account requirements. Do not assume a feature is included in every edition.
Make shortcuts work in real documents
Try one technique at a time in a copy of a document. For repetitive text, AutoText and Quick Parts can be more reliable than repeated copying; for long documents, use built-in Heading styles and the Navigation pane instead of manual scrolling. Save the file before trying bulk replacements or layout changes.
Related step-by-step guides
Learn to reuse text with AutoText or navigate headings using the Navigation pane.

C P Gupta is a YouTuber and Blogger. He is expert in Microsoft Word, Excel and PowerPoint. His YouTube channel @pickupbrain is very popular and has crossed 9.9 Million Views.
I like the helpful info you provide in your articles.
I will bookmark your blog and take a look at again here regularly.
I’m relatively sure I’ll be informed a lot of new stuff proper here!
Best of luck for the next!
Thanks dear. Glad you liked it.
Stay tuned for more useful stuffs.